Observability is a critical requirement for applications built with large language models (LLMs). LLMs are non-deterministic, which means that the same prompt can produce different responses. This behavior makes debugging and monitoring more challenging than with traditional software. LangSmith addresses this by providing end-to-end visibility into how your application handles a request. Each request generates a trace, which captures the full record of what happened. Within a trace are individual runs, the specific operations your application performed, such as an LLM call or a retrieval step. Tracing runs allows you to inspect, debug, and validate your application’s behavior. In this quickstart, you will set up a minimal Retrieval Augmented Generation (RAG) application and add tracing with LangSmith. You will:
  1. Configure your environment.
  2. Create an application that retrieves context and calls an LLM.
  3. Enable tracing to capture both the retrieval step and the LLM call.
  4. View the resulting traces in the LangSmith UI.
If you prefer to watch a video on getting started with tracing, refer to the quickstart Video guide.

Prerequisites

Before you begin, make sure you have: The example app in this quickstart will use OpenAI as the LLM provider. You can adapt the example for your app’s LLM provider.
If you’re building an application with LangChain or LangGraph, you can enable LangSmith tracing with a single environment variable. Get started by reading the guides for tracing with LangChain or tracing with LangGraph.

1. Create a directory and install dependencies

In your terminal, create a directory for your project and install the dependencies in your environment:
mkdir ls-observability-quickstart && cd ls-observability-quickstart
python -m venv .venv && source .venv/bin/activate
python -m pip install --upgrade pip
pip install -U langsmith openai

2. Set up environment variables

Set the following environment variables:
  • LANGSMITH_TRACING
  • LANGSMITH_API_KEY
  • OPENAI_API_KEY (or your LLM provider’s API key)
  • (optional) LANGSMITH_WORKSPACE_ID: If your LangSmith API is linked to multiple workspaces, set this variable to specify which workspace to use.
export LANGSMITH_TRACING=true
export LANGSMITH_API_KEY="<your-langsmith-api-key>"
export OPENAI_API_KEY="<your-openai-api-key>"
export LANGSMITH_WORKSPACE_ID="<your-workspace-id>"
If you’re using Anthropic, use the Anthropic wrapper to trace your calls. For other providers, use the traceable wrapper.

3. Define your application

You can use the example app code outlined in this step to instrument a RAG application. Or, you can use your own application code that includes an LLM call. This is a minimal RAG app that uses the OpenAI SDK directly without any LangSmith tracing added yet. It has three main parts:
  • Retriever function: Simulates document retrieval that always returns the same string.
  • OpenAI client: Instantiates a plain OpenAI client to send a chat completion request.
  • RAG function: Combines the retrieved documents with the user’s question to form a system prompt, calls the chat.completions.create() endpoint with gpt-4o-mini, and returns the assistant’s response.
Add the following code into your app file (e.g., app.py or app.ts):
from openai import OpenAI

def retriever(query: str):
    # Minimal example retriever
    return ["Harrison worked at Kensho"]

# OpenAI client call (no wrapping yet)
client = OpenAI()

def rag(question: str) -> str:
    docs = retriever(question)
    system_message = (
        "Answer the user's question using only the provided information below:\n"
        + "\n".join(docs)
    )

    # This call is not traced yet
    resp = client.chat.completions.create(
        model="gpt-4o-mini",
        messages=[
            {"role": "system", "content": system_message},
            {"role": "user", "content": question},
        ],
    )
    return resp.choices[0].message.content

if __name__ == "__main__":
    print(rag("Where did Harrison work?"))

4. Trace LLM calls

To start, you’ll trace all your OpenAI calls. LangSmith provides wrappers: This snippet wraps the OpenAI client so that every subsequent model call is logged automatically as a traced child run in LangSmith.
  1. Include the highlighted lines in your app file:
    from openai import OpenAI
    from langsmith.wrappers import wrap_openai  # traces openai calls
    
    def retriever(query: str):
        return ["Harrison worked at Kensho"]
    
    client = wrap_openai(OpenAI())  # log traces by wrapping the model calls
    
    def rag(question: str) -> str:
        docs = retriever(question)
        system_message = (
            "Answer the user's question using only the provided information below:\n"
            + "\n".join(docs)
        )
        resp = client.chat.completions.create(
            model="gpt-4o-mini",
            messages=[
                {"role": "system", "content": system_message},
                {"role": "user", "content": question},
            ],
        )
        return resp.choices[0].message.content
    
    if __name__ == "__main__":
        print(rag("Where did Harrison work?"))
    
  2. Call your application:
    python app.py
    
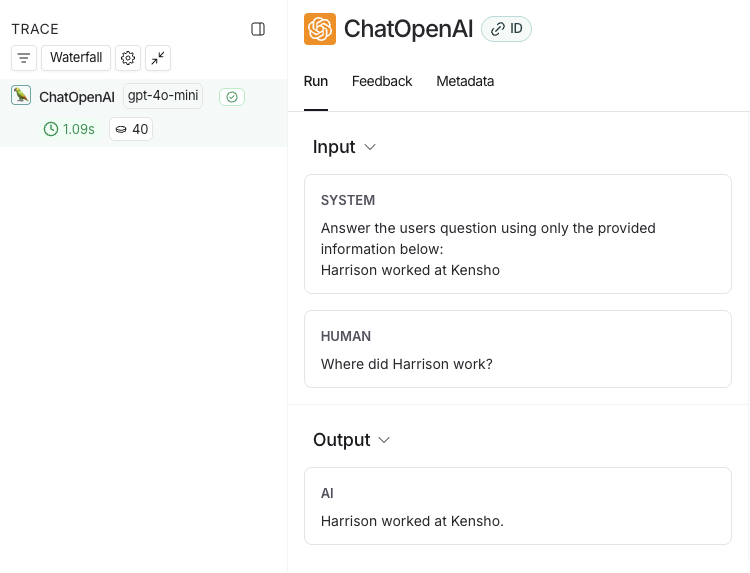
    You’ll receive the following output:
    Harrison worked at Kensho.
    
  3. In the LangSmith UI, navigate to the default Tracing Project for your workspace (or the workspace you specified in Step 2). You’ll see the OpenAI call you just instrumented.
LangSmith UI showing an LLM call trace called ChatOpenAI with a system and human input followed by an AI Output.

5. Trace an entire application

You can also use the traceable decorator for Python or TypeScript to trace your entire application instead of just the LLM calls.
  1. Include the highlighted code in your app file:
    from openai import OpenAI
    from langsmith.wrappers import wrap_openai
    from langsmith import traceable
    
    def retriever(query: str):
        return ["Harrison worked at Kensho"]
    
    client = wrap_openai(OpenAI())  # keep this to capture the prompt and response from the LLM
    
    @traceable
    def rag(question: str) -> str:
        docs = retriever(question)
        system_message = (
            "Answer the user's question using only the provided information below:\n"
            + "\n".join(docs)
        )
        resp = client.chat.completions.create(
            model="gpt-4o-mini",
            messages=[
                {"role": "system", "content": system_message},
                {"role": "user", "content": question},
            ],
        )
        return resp.choices[0].message.content
    
    if __name__ == "__main__":
        print(rag("Where did Harrison work?"))
    
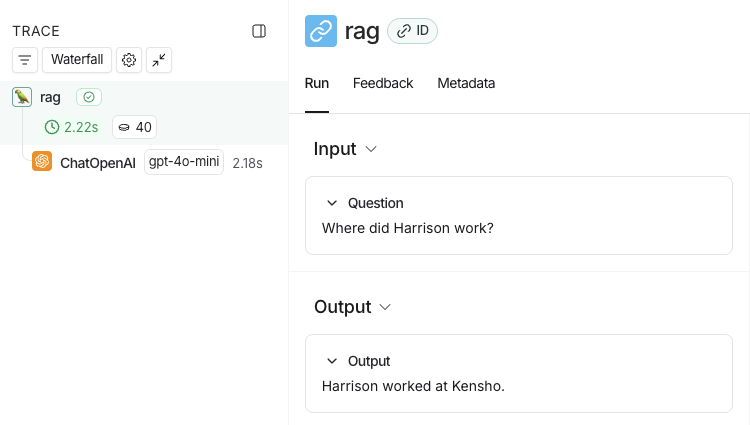
  2. Call the application again to create a run:
    python app.py
    
  3. Return to the LangSmith UI, navigate to the default Tracing Project for your workspace (or the workspace you specified in Step 2). You’ll find a trace of the entire app pipeline with the rag step and the ChatOpenAI LLM call.
LangSmith UI showing a trace of the entire application called rag with an input followed by an output.

Next steps

Here are some topics you might want to explore next:

Video guide