

1
Fetch the available tables and schemas from the database
2
Decide which tables are relevant to the question
3
Generate a query based on the question and information from the schemas
4
Safety-check the query to limit the impact of LLM-generated queries
5
Execute the query and return the results
6
Correct mistakes surfaced by the database engine until the query is successful
7
Formulate a response based on the results
Building Q&A systems of SQL databases requires executing model-generated SQL queries. There are inherent risks in doing this. Make sure that your database connection permissions are always scoped as narrowly as possible for your agent’s needs. This will mitigate, though not eliminate, the risks of building a model-driven system.
Before you begin
-
Install dependencies:
-
Set up LangSmith to inspect what is happening inside your chain or agent. Then set the following environment variables:
Build an agent with minimal code
1. Select an LLM
Select a model that supports tool-calling:2. Configure the database
You will be creating a SQLite database for this tutorial. SQLite is a lightweight database that is easy to set up and use. We will be loading thechinook database, which is a sample database that represents a digital media store.
For convenience, we have hosted the database (Chinook.db) on a public GCS bucket.
3. Add tools for database interactions
Use theSQLDatabase wrapper available in the langchain_community package to interact with the database. The wrapper provides a simple interface to execute SQL queries and fetch results:
Show output
Show output
4. Execute SQL queries
Before running the command, do a check to check the LLM generated command in _safe_sql:
run from SQLDatabase to execute commands with an execute_sql tool:
5. Use create_agent
Use create_agent to build a ReAct agent with minimal code. The agent will interpret the request and generate a SQL command. The tools will check the command for safety and then try to execute the command. If the command has an error, the error message is returned to the model. The model can then examine the original request and the new error message and generate a new command. This can continue until the LLM generates the command successfully or reaches an end count. This pattern of providing a model with feedback - error messages in this case - is very powerful.
Initialize the agent with a descriptive system prompt to customize its behavior:
5. Run the agent
Run the agent on a sample query and observe its behavior:You can inspect all aspects of the above run, including steps taken, tools invoked, what prompts were seen by the LLM, and more in the LangSmith trace.
(Optional) Use Studio
Studio provides a “client side” loop as well as memory so you can run this as a chat interface and query the database. You can ask questions like “Tell me the scheme of the database” or “Show me the invoices for the 5 top customers”. You will see the SQL command that is generated and the resulting output. The details of how to get that started are below.Run your agent in Studio
Run your agent in Studio
In addition to the previously mentioned packages, you will need to:In directory you will run in, you will need a Create a file
langgraph.json file with the following contents:sql_agent.py and insert this:Build a customized workflow
The prebuilt agent lets us get started quickly, but at each step, the agent has access to the full set of tools. We can enforce a higher degree of control in LangGraph by customizing the agent. Below, we implement a simple ReAct-agent setup, with dedicated nodes for specific tasks. We will add customer information to state. You will construct a dedicated node to set up the database for use by a particular customer. The customer node will fetch the customer ID and store it to state. Putting steps in dedicated nodes lets you (1) control the workflow, and (2) customize the prompts associated with each step.1. Initialize the model and database
As above, we initialize our model and database.2. Define the state
You will be creating a graph. The graph state contains messages as before, but has added fields to track customer information across nodes. These are referred to in tools, so you’ll define that now.3. Define tools
In this example, you will enforce limits on what a customer can access. The LLM prompt will reflect this, but the enforcement will happen during tool calling. This model increases the scope of_safe_sql.
_safe_sql and supporting routines
_safe_sql and supporting routines
execute_sql tool. Note something interesting. The tool has the graph inject the graph state into the routine when executed in the ToolNode. This relieves the LLM of having to be aware of this argument. In this case, we don’t pass the customer id to the LLM.
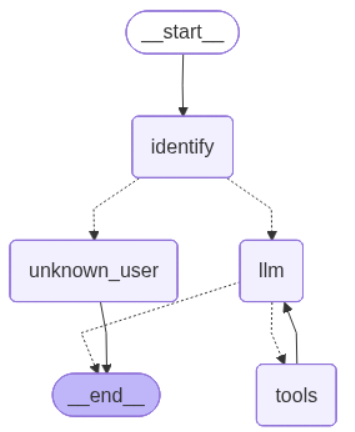
4. Add nodes and edges
Now, let’s build our graph, starting with nodes and edges. Theidentify node accepts the customer’s name as input, looks up the customer ID in the database, and stores it in the state. It will respond with a message if it is not in the database.
We will assume that the customer name is an input to the graph from the invoke function. This graph could be extended in the future with features such as user login and authentication.
See LangSmith trace for the above run.